Saturday, April 30, 2011

Butterfly Mornings

Good Morning!

It's only 6 AM and I am up and ready to go out the door.  Yesterday I went to the Creating Keepsakes Conference in Manchester, New Hampshire with MaryBeth and today I am going with Toni.  MaryBeth and I just shopped.  Toni and I are attending classes and shopping.  I'll tell you more about the classes and shopping later.  While I am waiting for Toni I thought I'd post a card that I created last night.

One of the booths I headed straight toward's was SEI's.  I purchased one each of their 6" x 6" With All My Heart, Corinne, Couture, and Sunny Day paper pads along with some borders and die-cut accents.  All of the papers are GORGEOUS and I cannot wait to "play" with them.  Last night I used some papers from the Sunny Day pad to create this card.

I used one of my new Lacey Circle Nestability dies to create the sun.  The large butterfly was stamped with a Hero Arts Heart Winged Butterfly wooden stamp.  I stamped it in a Versamark Watermark Stamp Pad and then applied Pink Gumball Perfect Petals to it.  The glimmer shows up better in my hand than it does in my photograph.  The smaller butterflies were punched from a Martha Stewart punch.  For all three butterflies I created 2 of each image so that I could back them to each other.  The stamp isn't perfectly symmetrical so I trimmed some of it to make the sides match.  I sandwiched some jewelry wire between the layers of each butterfly to create antennae.  I bent the wings up to give dimension to the card and added some brown rhinestones to add bling.   The text is stamped with a stamp from PaperTrey Ink's Egg Hunt clear stamp collection. 
Not sure if I have ever mentioned that I store my clear stamps in CD cases alphabetically and have the text lines stored on my computer so I can browse through them to see what I have.  When I saw the beautifully embossed SEI butterfly paper I immediately knew I'd use it with the PaperTrey stamp. 
You can see that I used a corner rounder on the layer papers and on the blank card. 

Be sure to visit the link party at SEI.  Just click on this link to get there. 
http://seilifestyle.blogspot.com/2011/04/link-party-8.html
That's it for now!
Talk to you later!
Carol

Saturday, April 23, 2011

Do the Polka...dots that is...Impression Obsession Challenge

Hi Everyone!

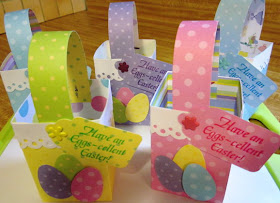
This week's Impression Obsession challenge is called Do the Polka....Dots That Is.  This challenge fit in perfectly with some of my plans for our Easter table.  Polka dots just scream out "Easter" to me so I created a tiny polka dotted Easter basket to put at each place setting.


I used double sided polka dotted tag weight paper from K and Company's Snuggle Bug 12" x 12" block to create my baskets. I used Impression Obsession's B5422 Eggs-cellent Easter wooden stamp to stamp the text onto some polka dotted gift tags that I created with a Sizzix tag die. I used a Martha Stewart dotted edger punch to create a "polka dotted" border and an AccuCut egg die to cut some polka dotted eggs. Two eggs are attached to each basket with Scor-pal tape. A third egg is attached to each basket with foam tape. The handle is attached to the basket with some brads from my stash.


It's probably too late for you to create these baskets for your Easter table, but they'd also make great May baskets or could be used as party favors.


Have a great Easter!
Carol

Wednesday, April 20, 2011

Birthday Cards

Hi Everyone!

It's school vacation week in Massachusetts so some of my "teacher" friends are coming over to craft today.  Thought I'd post a few birthday cards before I start setting things up. 


This first card is a great way to use of some of those scraps that you just cannot throw away.  The message is attached to the card with foam tape. 


I love the way this card turned out.  I used a square paper punch for the gifts and a Martha Stewart bow paper punch for the bows.  So easy and it's another way to use some scraps to create something pretty.


Remember those chipboard robots that I have used on birthday cards and valentines over the past year?
Well, this is the last of them.   They lasted a long time and have been a hit.


And that's it for today!  Have a great day!
Carol


Tuesday, April 19, 2011

DeNami Design Circle Stamps

Good Morning Everyone!


The other night I was too tired to do any work and too awake to do any sleeping so I decided to visit some of my "favorites" on the Internet. I visited the Denami Design site and discovered they have videos on stamping tips, techniques, and tutorials as well as virtual tours.


One of the videos I enjoyed is a tutorial called Circle Stamps by DeNami. The video shows you how the circle stamps can work with each other. DeNami has also created a printable guide that shows how their circle stamps and Marvy punches fit together. They have even color coded the punches which I think is great because I tend to remember which basic shape punches I have by their color.


I own the Demi Dot Circle Frame stamp and decided to use it for some cards. I used some pigment ink pads to stamp out several dot circle frames. Then I used detail clear embossing powder to emboss those images. I don't own the pink Marvy scallop circle punch, but I do own the pink Marvy plain circle punch so I used it to punch out my dot circle images. Then I used a scalloped circle Nestability die to cut some scalloped circles and adhered the dot circle images to them.


DeNami has deliberately cut out the middle of the image on the medium and larger circle stamps. They said they did that so ink won't build up there. I like the stamps that way because I can see if a stamp fits in the opening before I try to stamp it.


I stamped Denami's Wavy Stem Trio onto each of the dot frames. Then I stamped a Mini Flower wooden stamp from A Muse Artstamps onto each stem and added tiny adhesive pearls to the center of each flower.


Here are a few of the cards I created. Enjoy!


Have a great day!
Carol

Thursday, April 14, 2011

Birthday Cards

Hi Everyone!

I know that I have mentioned that I have been looking for some truck stamps.  Well, the other day I discovered a set of clear stamps from SandyLion designs that are called "Boy Clear Stamp".  There aren't any typos there.  Even though there are 15 clear stamps in the set, the name of the set is in fact "Boy Clear Stamp".  The set has a truck, a car, a sailboat, a rocket, and other forms of transportation as well as a dog, an alligator, and more.  I decided to use the spaceship, truck and car stamps on last night's cards. 

Recently while I was driving along one of the major highways in Massachusetts I glanced up at one of the overhead signs.  The road was about to split in more than one direction and the overhead sign was a series of arrows putting in a variety of directions.  I thought how lucky I was to know exactly where I was going because I couldn't imagine driving at 65 mph or more and having to interpret that very confusing sign. 

The layering paper I used on the cars and truck cards is from the American Crafts Travel paper collection.  The arrows on that paper remind me of the road sign that I saw the other day.  I stamped the cars onto some solid colored tag, embossed them and fussy cut them.  I used a PaperTrey Ink clouds die to cut the clouds and stamped "Happy birthday" on one of them with a clear stamp from my stash.  I added a layer of black tag (for the road) between the arrows and sky papers. 

You've seen cutaways on maps that highlight an area of the map.  Well, I used a cutaway on this card to draw attention to the truck that is delivering a package that says, "Happy Birthday".  I added some rhinestone headlights to the truck along with some fuzzy black sticker hub caps.  The truck is attached to the card wth foam tape. 


The layering paper on this card is from the dcwv "All About Boys" small stack.  I stamped and embossed "Happy Birthday".  I cut out a tiny spaceship from another piece of the paper and used foam tape to layer it on top of the same image.  I used the space ship clear stamp from the Boy Clear Stamp set, embossed it, fussy cut it and used foam tape to adhere it to my card.  I added some rhinestone "lights" to it.  I also put a few rhinestone stars in the sky.    

Last night I presented a Family Literacy Night.  Tonight I am presenting a Family Math Night! 
Busy days!  Busy nights!

Have a great night!
Carol


Wednesday, April 13, 2011

Mother's Day Cards

Hi Everyone!


My work area is starting to look like a card factory. I have baby cards, birthday cards, and Mother's Day cards stacked nearby. After I create a card I set it aside until I photograph it. After a card has been photographed I add a label to the back of it, put an envelope with it, and place it in a clear card bag. Then the card is filed by theme in a box. I've learned not to price the cards until a few days before a craft show in case I decide to give them to someone as a gift.  Although I don't post every card on my blog, I try to photograph each of them so that I have a portfolio of my work.


Today I will share some of the Mother's Day cards I have created. As soon as I saw some patterned paper with pears on it in the DeLovely Mini Deck from Cosmo Cricket I knew how I would use it. I've had some pear stickers here since last fall and knew they'd be great with that paper.


I adhered the ribbon to the patterned paper and used a corner rounder punch to round off the corners. I attached the paper to the blank card before I ran it through a square Nestability die so that I could cut through both layers. I didn't have a stamp for the message I wanted so I created the text on my computer. I used a corner rounder punch to round 3 of the sides on the card.


For this second card I ran the patterned paper through the square Nestability die before I adhered it to the card. This time I wanted to cut through only one layer.


I used a Hero Arts clear pear stamp from their Simply the Best clear stamp set on this card. I stamped each pear onto patterned paper, embossed them, and fussy
cut them before I used foam tape to adhere them to the layering paper. I added the ribbon to the paper before I attached it to the blank card. I modified the colors on my text so they would work better with this card.


I picked up the stickers on this card last year after Mother's Day. I especially love the vase epoxy sticker.
The text was created with a wooden stamp from the Lockhart Stamp Company.


I have some borders from K&Company's Citronella collection in my stash. Some of them have hibiscus flowers on them that I knew would look great with the hibiscus wooden stamp from Denami Design. I used a Sizzix Movers and Shakers die to create the blank card. I stamped some flowers onto tag and used watercolor pencils to color them before I fussy cut them. I used mini glue dots to attach them to the card. The text was created with a wooden stamp from the Lockhart Stamp Company.


The vase of flowers on this card was created with a stamp called "Sally's Bouquet" from Hero Arts. I used my Twinklette markers to color the images and then attached adhesive pearls to the center of each flower. I think that ric rac and gingham make a perfect combination so I added ric rac to the layering paper before I attached it to the blank card.


That's it for today. Tonight I am presenting a Family Literacy night. It's pouring out right now. I hope the rain stops before I have to haul of my materials to and from my car.


Have a great day!
Carol

Tuesday, April 12, 2011

Congratulations to the Ham Family

Hi Everyone!

I've been busy creating cards for my friend Gayle's sons.  Gayle and I have been friends for nearly 26 years. We met when Gayle came to my house to learn about my family childcare program. Robbie was born in July of 1985. Gayle's son, Ricky, was born in August that same year. I opened my family childcare in November, 1985 and Ricky was one of the first children I cared for.  Gayle's son, Brian, was born in January of 1987 and my daughter, Marie, was born in April that same year.


When Rob and Ricky were 3 and 4 years old they attended a preschool program at my house, while Marie and Brian played together at Gayle's house. Then, when Marie and Brian were 3 and 4 years old they attended my preschool program. All four children attended classes I taught for Lexington Recreation and the Teddy Bear's Picnic camp I directed each summer.


For years Ricky and Brian raced around and around on their tricycles on the "road" I had painted in our backyard. They were firefighters, police officers, trash collectors, carpenters and more as they played with our Little Tykes toys. They cooked with Chef Combo and tried the new foods that he introduced to them. They played with the countless batches of playdoh I made and listened to the hundreds of stories I read to them.


Now both of these sweet men tower over me. They take the time to save water bottle caps and other recycled things for me to use in my teacher trainings.


Ricky and Brian both graduated from the police academy this past year and both will be working in the Lexington Police Department like their father, Rich, and their uncle, Dana, did. Gayle and Rich are giving Ricky and Brian a party this Saturday to celebrate their new profession.


I created these cards for Ricky and Brian. I cut a road from black tag and adhered it to some grass patterned paper from dcwv. I used a "Gelly Roll" pen to draw the lines on the road. I mounted the road onto some sky paper and then adhered it to a blank card. The stickers are from the "police officer' sticker set from Me & My Big Ideas. I put some foam tape behind the police officers to add dimension to the cards. I added some Stickles to the headlights and the flashing red light on top of each police car.


It's funny, but as I sit here looking at the cards the expressions on the police officers faces truly remind me of Ricky and Brian!


Congratulations Ricky, Brian, Gayle and Rich!
See you on Saturday night!


Carol

Impression Obsession Encouragement Challenge

Hi Everyone!


This week Impression Obsession has an Encouragement Challenge. I decided to use the adorable small and large Dotsicle stamps and the "Enjoy the Sweet Things in Life" stamp to create a card for the challenge.


I used citrus colored Color Box pigement ink pads and stamped each dotsicle twice. Then I embossed each dotsicle with detail clear embossing powder. I fussy cut one of each color and then used a half inch circle paper punch to "cut" a bite out of each of them.

I used a Fiskars tear drop hand punch to punch some "drips" out of the remaining dotsicles. The dotsicle sticks are adorable mini popsicle sticks that I cut in half lengthwise before adhering one to each dotsicle.

I ran the layering paper for the card through a Cuttlebug embossing folder before I attached it to a blank card. I used a corner rounder punch to round off the corners at the top of the card to make it be "dotsicle" shaped.


Have a great day!
Carol
 

Monday, April 11, 2011

Babies, Babies Babies

Hi Everyone!

If you have been following my blog lately you know that I have been busy creating baby cards for upcoming craft fairs.  I did create a few birthday cards over the weekend, but for the most part it's been babies, babies, babies. 

I think I caught the "baby bug" while I was hanging out with my friend Janet a couple of weeks ago.  Janet had pictures and stories to share about her first grandchild, Sadie.  While Janet was cutting die-cuts, she mentioned that the mascot for Tufts University is an elephant and that her daughter and son-in-law both graduated from Tufts. 

The other day I picked up some K&Company Itsy Bitsy Adhesive Boy Borders and Itsy Bitsy Adhesive Girl Borders.  Both packages had 2 elephant borders.  Well, I decided I need Martha Stewart's Elephant double punch to use with those borders...And then this first elephant card was born!  Look at the punched out elephant.  See how the ear pops out.  I think that is just too adorable.

But...I do want to say this to you.  I don't love the way Martha's double punches work.  They don't always punch all the way through and I have been told that doesn't mean they don't work properly, but sometimes I wonder.  I love Martha's single punches and her edger ones too, but the cupcake, ice cream cone, and the elephant which are double punches do not punch as easily.  If you are reading this blog and have thoughts about Martha's punches, please post a comment about them. 

When Rob came home from work last night he came into the room to see what I was creating.  He looked at the elephant card and exclaimed, "Oh, that is so cute.  I love the colors you used".  I loved the way the elephant border looked with the elephants so much that I decided to create similar borders for some other cards. 


The ducks were created with an EK Success punch.  The water border is from K&Company's Itsy Bitsy Baby Boy Adhesive Borders.

The rabbits and sheep are from Martha Stewart punches.  The carriages were created with a Fiskars hand punch.  The text on all of the cards is from PaperTrey Ink's Baby Buttons clear stamp set. 


I added tiny black pearls to the animals for eyes.  I added baby buttons from Favorite Findings to the baby carriages for wheels. 

I don't have any workshops until tomorrow afternoon so it's back to making cards! 

Have a great day!
Carol

Saturday, April 9, 2011

More Baby Cards

Hi Everyone!

What a gorgeous day!  There's definitely a touch of spring in the air.  I quickly snapped photographs of some of the cards I've created recently.  This first card was created with some of the flowers I had leftover from the paper floral wreaths I made.  I used a Sizzx tags die cut to create the tag.  The text was stamped with a wooden stamp from Great Impressions.  I used a white "Gelly Roll" pen to faux stitch around the edge of the  card.

The other cards I'd like to share are all baby cards that were created with images from Inkadinkado clear stamps.  With the exception of the first card the text was created with clear stamps from PaperTrey Ink's Baby Buttons set. 


I used a Marvy Uchida purple circle punch to punch a hole through the pink dotted paper from K & Company's Snuggle Bug 12" x 12" paper stack. I placed some patterned paper from dcwv in the opening and stamped "baby girl" in the lower right hand corner before I ran the paper through a Cuttlebug Hearts folder. Used foam tape to add the elephant to the card.


I couldn't find a button that "worked" with this card so I cut a circle from some scrap paper to create a button.  The pink sorbet twine is from The Twinery. 


This adorable little turtle reminds me of Franklin. 

I think this little giraffe is precious. 

That's it for today!


Hope you have a nice night. 
Carol

Friday, April 8, 2011

Paper Flowers Wreath

Happy Friday Everyone!

It's been a busy week and I for one am happy that it's nearly over.  I have an Afterschool Cooking Class this afternoon and then I have a little break until Tuesday afternoon. 

You may remember the Christmas wreath I created ages ago which was followed by a Valentine's Day wreath.  Next came an Easter egg wreath.  Mickey saw the Easter wreath at Sandy's house and asked me if I'd make a flower wreath for her mother. 

I used a Sizzix "Large Daisies" die to cut some large and small daisies.  Many, but not all, of the papers I used were from the K & Company Snuggle Bug 12" x 12" paper stack.  I used a hot glue gun to adhere the flowers to the wreath form.  I felt that the middle of the small flowers needed something.  I tried white pompoms, but they looked too bulky.  I tried white buttons, but they looked too heavy.  I ended up running a piece of white tag through a Cuttlebug dotty embossing folder and then using a 3/4" paper punch to cut out some circles.  I used my glue gun to attach the circles to the flowers.  Now I was happy.  Those circles with the raised dots added the texture I wanted to the wreath. 

I've been busy creating more baby cards and will share them with you sometime this weekend. 

Have a great day!
Carol

Thursday, April 7, 2011

Patterned Paper

Hi Everyone!


Marie's "Black and White" 24th birthday party was a huge success.  The banner I created hung over our dining room table.

I cut some paper with a floral and a circle paper punch to create party picks for the cupcakes.  For each pick I punched 2 flowers and 2 circles. I glued a circle to the middle of each flower. I added a large adhesive glue dot to the back of a flower, pressed a toothpick into the glue dot and then covered it with another flower.  I put a party pick in some of the cupcakes and a candle in each of the others.  I also placed a party pick inside the fold of each of the black cloth napkins.

The largest gift bag was store bought.  I paper punched black circles and adhered them to the bag.  I used the Around the Town Timeless Template from PaperTrey Ink to create the polka dot gift bag and the Rounded Wrap Up Timeless Template from PaperTrey Ink to create the small bag.

The flower on the largest gift bag was created with the largest die from PaperTrey Ink's Bloom Builder's #1 Die Collection.  I also added some baby black ric tac to the bag.  The small striped gift bag was created with PaperTrey Ink's small All Around Town Timeless Template.  The other bag was created with PaperTrey Ink's Rounded Wrap up Timeless Template.

Marie loved her Black and White party.  Cards, gift bags, party picks, and a banner.  All from magical patterned paper.

Have a good night!
Carol

Friday, April 1, 2011

Baby Cards, Edger Punches, and a Snowy Morning

Good Morning Everyone!
I must have jinxed New England when I named yesterday's post "Black and White" because this is the view from my computer chair this morning.  Just yesterday I was smiling at the daffodil buds that were sprouting along the side of my house.  Now they are under a blanket of snow.  It's not a major storm, more of an aggravation than a concern.  But Robbie will need to shovel the driveway and steps to rid them of the wet mess that fell last night and is still falling as I type this post. 
While I was out shopping for some black and white adhesive pearls for Marie's cards I spotted this set of clear stamps from Inkadinkado called, "Welcome Baby."  I instantly fell in love with the adorable elephant and turtle and had to buy the set.  Happily the set was on clearance at Michaels.  It's not on clearance on the Inkadinkado site, but they are offering 20% off of everything in their online store this weekend when you check out with the code "NOFOOLIN". Janet, I picked up this set for you because I know you'll love the elephant as much as I do. 

I have several other clear stamp sets from Inkadinkado that coordinate perfectly with my new set.  I combined stamps to create these cards. 

I stamped the elephants on pink and blue patterned paper with pigment ink.  I embossed them with clear embossing powder and fussy cut them.  I stamped "Baby" along the bottom edge of some white tag.  Then I placed the elephant on the tag, but didn't attach it.  I stamped "welcome" above the elephant, then I removed the elephant and embossed both words.  I ran the white tag through a Cuttlebug dotted embossing folder.  The elephants are attached to the white tag with foam tape.  I used a marker to add color to just some of the dots around the elephants.  I mounted the white tag onto patterned paper and added some baby white ric rac above and below the white tag before I adhered the patterned paper to blank white cards. 

The other day my friend Janet came by to do some crafting.  While we were working I mentioned that I am trying to think of a way to store my edger punches so that they will be within my sight.  Janet suggested that I punch out a sample from each punch and store the samples in a folder.  I thought that was a great idea, but decided to display them in a picture frame that can be hung in my work area.  I think this will add an inspiring touch to my own little corner and there's still room for more samples when I buy more punches!


Today I am teaching cooking in an afterschool program.  The children want to decorate cupcakes.  I need to bake the cupcakes now so they can frost and decorate them during class.

Have a great day!
Carol