Monday, April 29, 2013

Gift Bag with Stylish Stix

Hi Everyone!

I couldn't wait until tomorow to share this with you.  I just finished creating a gift bag that I decorated with Stylish Stix from the Queen & Company.  I was inspired by the card on Heidi Van Laar's blog at this link.

I used some of the Stylish Stix that I purchased at the Creating Keepsakes Conference on Saturday to create my bag.  Take a look at the bag and I'll tell you how I decorated it. 


I ran a piece of white tag through my Fiskars crimping tool.  I found the "Make a Wish!" cupcake top in my stash leftover from another day. I used some glitter paper along with a leaf die to create my flames. 

 
Such a simple way to create a cheery birthday gift bag for any age.
 
That's it for now!
Carol


Shopping Trip!

Hi Everyone!

On Saturday Janet, Angela, Yvonne and I went to the Creating Keepsakes Conference in Manchester, New Hampshire.  We don't attend the classes.  We just go SHOPPING!

We started our day with breakfast at Panera in Burlington, MA and then Angela drove us to the conference.  I thought I'd share pictures of some of the things I bought with you today. 

I picked up some new rolls of Washi tape.  Janet shared a no cost way that she learned about storing Washi tape.  Take a paper towl tube and cut through the length of it in a straight line.  Roll the tube up tightly and slide the rolls of tape onto it.  Release the tension of the tube and it will open up to the full width of the tape.  The tape will now stand up as a tube of tape.  Here's the tape I bought on Saturday.

I am not sure why I love adding cloud images to my cards.  I own some cloud stamps, a clouds embossing folder, clouds Washi tape and ribbon, a Sizzix clouds die, and some metal clouds dies, but just HAD to buy the cloud punches I found in the Fiskars booth.


The deal in that booth was if you bought 3 punches you got a 4th one for free.  So I picked up a small jigsaw puzzle punch.  I already own the large one.  My preschool students love punching out puzzle pieces and gluing them together to make a "puzzle".

 
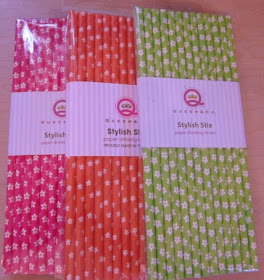
There were ideas for using "Stylish Stix" in the Queen & Company's booth.  I saw pictures of those ideas posted on Pinterest.  I plan to use the straws on gift bags.  My only regret is that I hesitated before I purchased them so the purple and yellow floral ones were gone before I could buy them.
 
 
I stopped by The Stamps of Life booth and was tempted to buy lots of packages of stamps, but chose just one package so I could buy other things too.  I chose ladybugs2love.
 

I bought some packages of tiny buttons
 
 
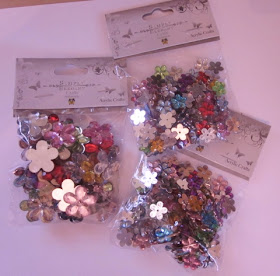
and some floral and star gems.


I also bought three 6" x 6" paper pads and one discontinued SEI club kit. 
 
We took a shopping break and had lunch in the hotel.  Later in the afternoon we stopped and shopped at Hobby Lobby.  We don't have a Hobby Lobby in Massachusetts so we like stopping at one when we are in the area. 
 
At Hobby Lobby I picked up a few things for my classroom. 
 
I've already been "playing" with my new toys so expect to see some photos of my cards soon.
 
Have a great day!
Carol


Sunday, April 28, 2013

Hoping You're on the Mend

Hi Everyone!

Here's the current challenge for Case This Sketch


Here's my take on the sketch.


To play along with the theme of the sentiment I chose, I used a stitched-looking ribbon and real bandaids.  Clean, simple, and fun!
 
Have a great night!
Carol
 

Tuesday, April 16, 2013

Challenge 23

Hi Everyone!

I created a couple of cards over the weekend for a challenge.  I just realized it's too late to submit them to the challenge, but I can still share them with you!  The challenge was on Case This Sketch at this link.  Here's what the sketch looked like:

 
Here's the first card I created for the challenge.  That's Washi tape that is placed diagonally across the card.  The flowers were created with a Denami Designs wooden stamp.  I fussy cut them and used foam tape to adhere them to my card.  The text was created with a Northwoods wooden stamp.  


Here's my second card. 


I used a die to cut the cloud and then pierced the edges of it.  I stamped an Inky Antics sentiment on it.  The airplane was created with an Alley Way stamp.  I fussy cut it and used foam tape to adhere it and the cloud to the card.  That's Washi tape again across the diagonal of the card. 

Time to call it a day!
Carol

Monday, April 15, 2013

Ducky Decor

Hi Everyone!

Many of the puzzles and lacing cards I purchase for my classroom come in wooden boxes or trays.  To make clean up time easier for my students I store most of their toys in clear containers that I have labeled with words and pictures.  But I keep the wooden containers so I can use them for my crafts. 

I am planning to change the theme of my bathroom to ducks simply because I saw a shower curtain that I love.  The other night I used my duck Nestability dies and a wooden tray to create this shadow box.


Angela gave me a Heidi Grace "Sunshowers" 12" x 12" paper pad for my birthday.  The background paper that I used on the shower box is from that pad.  I fussy cut a sun from a second sheet of paper and adhered it to the paper with a double thickness of foam tape. 

The polka dotted papers are from Michaels.  There was a great deal there last week.  You could buy 5 packages of 25 decorative or 50 solid color sheets of tag for $10.00.  The eyes on the medium and large ducks are tiny brads.  I used a marker to add eyes to the small ducks. 

I used heart paper punches to create each duck's wings.  I cut the hearts in half before I adhered them to the ducks.  I used foam tape, glue dots, and small corks to make the ducks be 3 dimensional. 

That's it for today!
Carol

Sunday, April 14, 2013

Thank You Cards

Hi Everyone!

Tomorrow is Patriot's Day in Massachusetts so it's a 3 day weekend.  I LOVE 3 day weekends. It's like someone gave me an entire day as a gift. 

I spent most of the day creating pages for my classroom's scrapbook.  I also created a couple of thank you cards. 

I used one of my newest stamps from the Simon Says "Flower Friend" clear stamp set on the first card.  The papers are from Graphic 45's French Country 6" x 6" paper pad.  I used spray mist to add color to a Petaloo flower.

 
My cousin, Linda, and her husband, Tom, were here for dinner last Sunday.  We had a wonderful time hanging out.  They brought me some beautiful flowers and a gift certificate to Cheesecake Factory.  They're planning to move to Florida in a couple of years.  I decided to use a flamingo from K&Company's Citronella set on their card. 


The sentiment was created with a Stampendous wooden stamp.  The sun was created with a Memory box stamp.  The papers are from dcwv. 
 
Have a great night!
Carol


Tuesday, April 9, 2013

Today's Cards

Hi Everyone!

Just finished cutting up lots of paper strips for my students to use for a 3-d art activity tomorrow.  Before I head to bed I thought I would share a couple of cards.  This first card sort of grew after I stamped the image on it. I didn't like the way the flower stems looked after I highlighted them with a marker so I decided to cover them up with additional flowers.  Now I am happy with the card.


The vase of flowers were created with a Hero Arts stamp.  The sentiment was created with a Lockhart stamp. 

This second card was created with a couple of my favorite Great Impressions get well stamps.


The layering paper is much more vibrant than it appears in the photograph.  I added Glossy Accents to the cattails and the duck's feet.  
 
That's it for tonight!
Carol


Tag cards

Hi Everyone!

When I saw this sketch on the Case This Sketch blog I immediately thought of my tag collection.


I own several different tag dies and a tag paper punch.  Every now and then I go through my collection of scraps and punch some tags out of them.  If I need a quick card I embellish one of them and add it to my card. 

Here's one of the cards I recently created.

 
I used dies to create the clouds and then I ran the clouds through a Cuttlebug Swiss dots embossing folder.  The sentiment was created with an Inky Antics wooden stamp.  The balloons were stamped with a Lockhart stamp.  I fussy cut them and used foam tape to adhere them to my card.
 
Here's a quick and easy card I made for a friend's birthday.
 
 
The paper airplane was created with a Lawn Fawn stamp.  The clouds were cut with a die.  Then I ran them through a Cuttlebug Swiss dots embossing folder.  The sentiment was created with a Memory Box Stamp. 
 
That's it for today!
 
Have a nice night!
Carol


Saturday, April 6, 2013

Happy Birthday Marie

Hi Everyone!

It's 4 PM on Saturday and I would love to say I have accomplished so much today, but that would be a huge lie.  I've been puttering around, but other than getting some of my lesson plans written for next week, I've done very little.  As Robbie would say I've been "just chillin'" which seems to be a new Saturday tradition for me. 

Marie's birthday was on Wednesday.  We celebrated on Wednesday night as a family and again on Thursday night with a few of her friends.  Both parties were much more low key than usual.  That's because they happened during the week and there just wasn't enough time for a major production. 

I love the card that I created for Marie this year.  A couple of weeks ago she mentioned that she loves carrot cake and so I chose carrots as the theme for her card and her cake. 


The bunch of carrots in the center of the card were created with a Lockhart stamp.  The single carrots that circle the card were stamped with an Impression Obsession stamp.  After I cut them, I fussy cut them and adhered them to the card.  Then I applied Glossy Accents to each of them. 
 
The "Love you a bunch!" sentiment was created with an Inky Antics stamp.  The "Happy Birthday" sentiment was created with a Memory Box stamp. 
 
Here's a link to the recipe for the yummy carrot cake Robbie baked for Marie.
It's from the Wilson's Farm Cookbook.  ALL of Lynne Wilson's recipes are amazing.  I make her Cream of Carrot Soup for our Christmas dinner each year.  We also eat it regularly all year round.
 
I need to make some cards for a raffle at work so stop by in a day or two to see what I make.
Enjoy the rest of the weekend. 
Carol