Search This Blog
Sunday, January 16, 2011
Birthday Cards
It all began when I was viewing the sale stamps on the A Muse Art stamps web site. I was looking at the image for the Holiday tree stamp, but I didn't see it as just a tree. I also saw it as a party hat. Best of all that holiday tree/party hat was and still is on sale for just $2.00. So I purchased that stamp and a few others and 2 days later the package arrived at my house.
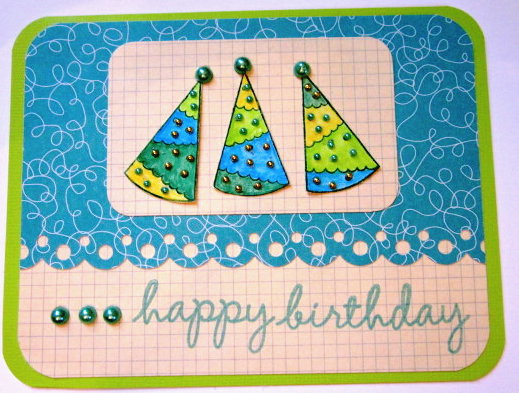
I used my water color pencils to color in 3 "party hats", cut them out, and adhered them to some paper from the Sassafras Nerdy Bird wee bundle. I adhered that paper to another paper from the Sassafras Nerdy Bird wee bundle, and stamped "happy birthday" with a clear stamp from my collection. I attached jewels from my stash to the dots on and the tops of the party hats.
Now that I had created one birthday card I decided to make a few others. I used some papers from
Cosmo Cricket's Material Girl pad and a Hero Arts cupcake cling stamp to create this card. I stamped the bottom part of the cupcake stamp onto one paper and the top onto another paper. After I cut it out, I ran the "muffin wrapper" part of the cupcake through one of my paper crimpers and attached it to the layering paper. After cutting out the "frosting" on the cupcake I used pop dots to attach it to the layering paper.
The musical notes paper on this card is also from the Sassafras Nerdy Bird wee bundle. The cupcakes paper is from SEI's Happy Day collection. The birds are cut from a paper from dcwv Songbirds pad.
That's it for today!
Have a great night.
Carol
Friday, December 31, 2010
SEI Mimosa petals Valentine
It's the middle of the afternoon on December 31 and as Rob would say I am "just chillin'". I've done some cleaning, made some valentines, and have been thoroughly enjoying this last day of 2010.
While I was cleaning I came across a package of SEI Mimosa petals paper flowers. I took one of the flowers out of the package. The petals on it looked like hearts to me. I cut off one of the petals so I could play around with it. The remaining flower looked like a butterfly to me...and that lead to this card.
I ran the layering paper through a Marvy Uchida heart crimper. Then I used a Martha Stewart hearts edger paper punch to embellish the bottom edge of the layering paper. I mounted the paper onto a dark peach card that perfectly matched my butterfly and heart and used some pop dots to attach the butterfly and heart to my card. (My photograph doesn't do the colors of the card, butterfly, and heart justice as they appear to be more orange than peach.) The butterfly's trail, antennae and body were created with strips of Recollections pearl embellishments. I used SEI chocolate milk alphabet puff stickers for the lettering.
It's a clean and graphic card and it works for me. Hope you like it too.
Enjoy your night!
Carol
Thursday, August 26, 2010
More Birthday Cards
I love everything about Christmas especially our family traditions, but for some reason I keep putting off working on Christmas cards. It may be because I know once I get started I won't want to work on anything else. It may be because I dislike snow and ice so much that I don't want to think about the winter holidays. My friend Susan suggested that I create more birthday and thank you cards for her co-workers so that is what I am doing.

I used paper from Martha Stewart's Classic Woodland and Classic Botanical 12" x 12" paper pads to create these first 2 cards. The papers are layered onto blank A2 cards which measure 4.25" x 5.5". I cut some white tag so that it measured 4" x 5.25", placed it in a dotted embossing folder and ran it through my Cuttlebug. I cut the red and aqua papers to that they measured 4" x 2" and adhered them to the white paper.
I used Jeanette's, the owner of Stamped Designs in Dover, NH, bow making technique to create a bow for each card and then used Scor-pal tape to adhere the ribbon to the layering paper. Then I attached the layering paper to the A2 card.
The scalloped and plain circles on both cards were cut with circle Nestabililties. I put the white circles in the dotted embossing folder and ran them through my Cuttlebug before I attached them to the scalloped circles. "Happy Birthday" was stamped with a Northwoods Wooden Stamp. The cupcakes are K and Company embellishments.

I tend to use A2 cards for most of my cards, but I created the blank card for this next card. I cut some brown tag from the SEI Moravia collection so that it measures 4" x 11" and scored and folded it at 5.5". This means I was able to create 3 blank cards from just one sheet of 12" x 12" paper.
Hint: when you are cutting paper that you plan to fold be sure to cut it so that you will be folding parallel to the grain of paper. To determine the grain of a 12" x 12" paper hold the edges of the paper and gently bend it in the middle. You will feel the paper resisting when you bend it in one direction and will find the other direction bends more easily. That is the direction you will want to use when you are creasing and folding your paper. Your crease and fold will be neater when you do it that way and your paper will not crack. Try it both ways so that you will understand me.
I cut some white tag so that it measured 3.75" x 5.25" and adhered it to the card. I cut some brown tag so that it measured 3.5" x 5" and centered it on the white tag.
I am guessing that many of you are like me and cannot throw away your paper scraps. I cut the 9 rectangles that you see on the card from scraps from the SEI Happy Days paper collection. Each rectangle is 1" x 1.5". I used my Northwoods wooden "Happy Birthday" stamp to stamp the message onto a scrap of white tag and then I adhered the message to my card.
You can use your scraps to create a similar card and add any sentiment you want to the card.
Have a great day!
Carol
Sunday, August 1, 2010
Sympathy and Apology Cards


The paper from SEI’s chocolat stack has just the elegance that I wanted for my sympathy cards. If you study these first 2 cards you will notice that I played around with the same blueprint when I created them. I’ve decided that I prefer the one that has the patterned paper at the top, the ribbon/bow in the center and the solid paper at the bottom. I think the patterned paper at the top helps lead your eye to the message at the bottom of the card. The card with the solid paper at the top feels bottom heavy to me. I added pearls to both of the cards. Although I seldom wear mine I love pearls. When I saw my mother wearing her pearls I always thought she looked very dressed up and beautiful and that’s how I wanted my sympathy cards to look

I’m happy with his card. I wasn’t sure where I wanted to place the sentiment and had accidentally glued my patterned paper onto the blank card before I made that decision. At that point rather then run the risk of stamping a sentiment that wasn’t clear and crisp directly onto my card I stamped it onto a coordinating strip of paper and added it to my card. The lettering on many of the stamps in this set is tiny and doesn’t require much ink so I like to practice with each of those stamps before I use them on my cards. Both of the papers I used on this card are also from SEI's chocolat stack.

I love this card. I think it looks elegant and tasteful. I used my corner rounder punch on the layering paper and on the card. I used a Martha Stewart butterfly punch to create the butterfly embellishment. I fashioned some antennae for the butterfly out of thin jewelry wire. I don’t think they show up in the photograph. Both of the papers I used on this card are from SEI's chocolat stack.
Thursday, July 29, 2010
Poppy Paper from SEI
Warning! Warning! Warning! This is going to be a long post. Probably the longest one I have ever written. But it comes with pictures so I think you'll enjoy it.
Hope you noticed that a few weeks ago thanks to blogger I was able to add a "search" button to my blog. It’s a very cool resource and I use it often when I am trying to remember if I have already posted something or not. So if you search for "SEI" for example the link to the birthday cards I made with their Happy Day paper will pop up. When I read that posting I realized that I never did post pictures of the cards I made with their Moravia paper. I am hoping that I actually took pictures of them because I’m not sure if I have any of those cards left...but we won’t worry about any of that today. I still have lots of that paper left and will make more cards with it one of these days.
If ink, paper, embellishment, stamp companies, etc. have a newsletter I sign up for it. I usually skim through them when they appear in my mailbox. I learn about products and new techniques. Sometimes I receive coupons or special offers. And sometimes I learn about many people’s favorite 4-letter word....SALE!
Not long ago I got an e-mail from SEI telling about a clearance event and I decided to check it out. As I had anticipated I saw some blocks that I loved. They come in different sizes. Most of the cards I make measure 5.5" x 4.25" or 4.25" x 5.5" so I mostly purchase the small blocks that are 4.5" x 6.5". That’s not to say that I never purchase the 8" x8" or the 12" x 12" blocks because sometimes I do. But sometimes the patterns on the 12" x 12" blocks are larger than those on the smaller blocks and don't look as good on my cards as some of the smaller patterns do.
So I purchased one block each of their Eerie Alley, Chocolat, and Poppy papers. The package arrived yesterday and I LOVE LOVE LOVE (I sound like Toni!) what I bought. I stayed up until 2 AM creating cards. I just couldn’t help myself. Got up this morning and have already made another card.
All of the cards I have made so far have been created with the Poppy paper. I am sort of thinking that I "NEED" to buy another block of it while it’s still available. MaryBeth and I have great jokes about "NEED" versus "want". I might be good. I do have a lot of paper here to work with so I should be good. We’ll see.
Without further babbling...here are the cards.

Used my Fiskars small poppy punch to create the flowers on this card. I used scraps that were leftovers from the other cards when I was punching the flowers. I have saved every scrap and every leftover trimmed piece from the Poppy block in a little clear box because I like the way the colors work with each other and I want to use as much of it as I can. The leaves and stem were created with a clear stamp from PaperTrey Ink's "Turning a New Leaf" set. I use that set probably more often than any other set that I own. "Thinking of you" is from the Hero Arts clear stamp set called "Everyday Sayings". I haven’t had that set for very long. I love the variety of phrases on it and know it will become one of my frequently used sets.

I love this card. It’s not very busy and it works for me. "Thinking of you" is from that same Hero Arts "Everyday Sayings" clear stamp set. I added some twine to the button before I attached it to the card with a large glue dot.

This card reminds me of kitchen tiles. Not sure why! I like it. A lot. Not sure where the "Happy Birthday" clear stamp came from as I keep all of my Happy birthday stamps in the same cd case. When you click on the card to enlarge it notice the gold flourish that is on the square in the upper left hand corner and on the bottom middle square. Wish I had paid more attention and used a scrap with that gold flourish in the upper right hand corner too...just thought I'd share that thought with you so maybe you will think of it when you are creating your cards.

I love the background paper on this card. Used my plain and scalloped circle Nestabilities to create the circles. See the brads that I told you I had stocked up on. Same deal with the flowers. I pick them up when I see a good deal on them. Gems too. Didn't use any gems this time.

I think I like this card. I want to like it. It’s a little different. "Hello" was created with some Mrs. Grossman stickers that I bought a long time ago. The color works perfectly with this paper collection.

Now this card has a different color scheme than the others, but it is from the same block. Used my one-inch circle punch to create the circles. Notice there are more brads in other colors. Used the same Fiskars punch for the flowers and the same Hero Arts "Everyday Sayings" for "thinking of you."
Now many of you may not have the same papers that I used on today’s cards, but you can still create similar cards. Just substitute papers from your own collection and "copy" the ideas I have shared with you. Or so a little shopping with SEI!
Just got a great newsletter from http://www.scrapbooksetc.com/ in my mailbox. Sign up for it. Their newsletters are always filled with wonderful ideas.
I'd love to know which of today's cards you like best and why. Please post a comment to this blog so that I can share your thoughts with others. Your suggestions may trigger new card ideas for all of us.
Have a great day! I'm off to do some work.
Carol


