Search This Blog

Saturday, December 31, 2011

Chevron Valentines

Happy New Year's Eve!

It's going to be a quiet night here, but I am fine with that because it's been a very busy week.  While Janet and I were out shopping yesterday she asked if I had watched Jennifer McGuire's video on chevrons.  I hadn't, but decided to watch it last night.  Like ALL of Jennifer's videos it was amazing and I decided to create a chevron of my own. 


I looked through my pink, red, and valentine papers and chose 5 of them to create a chevron that could be used on some of my valentines.  I followed Jennifer's instructions exactly and then cut up some of the chevron to create this first valentine. 

The flowers were created with a Wavy Stem Trio wooden stamp from Denami Design and the text was created with a wooden stamp from Victorine Originals.

I used one of my standard heart Nestabilities to cut a heart from my chevron.  Then I mounted the chevron heart onto a scalloped white tag heart that was created from a scalloped heart Nestability die.  I pierced the edges of  the white heart to make it look like lace.

The text was stamped with a Lockhart wooden stamp.  The tiny hearts on either side of the text and at the top of the chevron heart are brads.

I used the negative stencil that was left after I die cut the heart to create my third card.

As you can see I used Denami Design's Wavy Stem Trio wooden stamp on this card too.  I found the shiny white heart shaped buttons in my stash. 

I used another piece of my chevron on today's 4th card.
Yesterday I found some valentine stickers in the dollar bin at JoAnn's.  One of the stickers was a tiny envelope.  I took it apart and used it as a pattern so I could create additional envelopes.  I used a punch to create most of the hearts.  Some of them are epoxy stickers from my stash.

Hope you have a wonderful night!
Carol


Friday, December 30, 2011

Happy Almost New Year!

Hi Everyone!

I just wanted to stop by to wish everyone a Happy New Year.  I've rearranged my stamps and other crafting supplies and will soon be working on some new birthday, thank you, and valentine cards and crafts. 

The wooden stamps that are now directly in front of me mainly have a valentine theme.  Others are there because I want to use them on some cards soon too.
Please stop by soon to see if I've updated this blog.  Meanwhile, hope you have a safe and happy New Year's Eve. 

Happy New Year!
Carol

Thursday, December 22, 2011

Owl Pillow Box

Hi Everyone!


I am constantly amazed by and excited about all of the creativity that can be found on the Internet.  Yesterday I discovered the coolest owl pillow boxes on  Lynn Put's blog, Genevieve and Catherine's blog and Kerry's blog.  Those of you who follow my blog regularly may remember that Robbie is fascinated by owls so I decided he'd love to receive a gift in an owl pillow box.


I don't own a pillow box die, but I do have a downloadable template for one that I purchased from Denami Design.  I also have a huge stash of white pillow boxes that I purchased from Uline several years ago.  I saw my stash when I was digging through my trunk of gift wrap, tissue paper, gift bags, etc.  and decided to use one of the premade boxes. 


I used my blue Marvy Uchida heart punch to create the owl's feet and my yellow Marvy Uchida heart punch to create his beak.  I used a 1 3/8 circle punch for all of the owl's "feathers" and a 1.75 circle punch for his eyes.  The pupils were punched with a .75 circle punch.  I free cut his wings. 


I glued just the upper part of each feather to the pillow box.  All of the papers I used were from my scrap box.  The more I create the more I seem to use and treasure my scrapbox.  I added some rhinestones to the pupils to bring life to the owl. 


This project took me less than 15 minutes to create.  When I picked up my owl just now I realized he'd also look adorable on a gift bag so if you don't have a pillow box, you may want to created him on the front of a bag.


Have a great day!
Carol

Snowman Tic Tac Cover

Good Morning Everyone!


Just 3 days until Christmas!  Most of my shopping is done.  Some of my gifts are wrapped.  All of my cards are created, written, and addressed.  Dinner for Christmas Eve and Christmas Day is planned and most of the shopping for those meals is done. 


But...there still are dozens of cookies to bake.  And...the Christmas decoration bins are scattered all over Marie's room.  She'll be home later tonight so I MUST get them out of there TODAY!


While I was surfing the web looking for ideas for stocking stuffers one idea that kept popping up was a Snowman Tic Tac Cover.  Each one was slightly different, but all of them were adorable.  Some had a snowman that had been stamped and others had a snowman that had been cut by hand. 


I decided to use my EK Success Snowman punch to create the snowman for my Tic Tac covers.

I punched a snowman out of white tag.  I also punched just the top of the snowman out of black and red tag.  I fussy cut the black tag so only the hat was left and fussy cut the red tag so only the scarf was left.
Then I adhered the hat and the scarf to the snowman.   I used markers to color the snowman's nose and to add an eye and buttons to him.

I have to say that I was shocked by the price of a container of Tic Tacs.  I clearly hadn't purchased any for a long time.  I bought some packages simply because I loved the idea of the craft I was going to create.

Tic tac containers are not a perfect rectangle.  They are just a little wider across the bottom than they are at the top.  With that in mind I deliberately cut the patterned tag I used for the cover so that it was just a tad longer than 3" and was 4.5" wide.  I knew the paper was just a little longer and a little wider than it needed to be, but gave me some wiggle room when I was covering the tic tac package.  I scored along the 4.5" side of the paper at 1.75".  Then I lined it up on the Tic Tac package to make sure it was going to fit. 

I glued the snowman to the panel I had created and used a one inch paper punch to punch through the snowman and the tag that would be covering the tic tac package. 

I used Scorpal tape to attach the snowman part of the tag to the Tic Tacs.  Then I carefully scored the paper that was on the side of the container.  I used my tape to attach the side and back panels.  I am hoping that you understand that I was using just one piece of tag to wrap the Tic Tacs and I am just trying to explain the process.  When the 3 sides were covered I trimmed off the excess paper. 


Cute!  I already have ideas for other Tic Tac covers and even created one style last night...but that's for another day. 


Off to do clean up Marie's room. 


Have a great day!
Carol

Wednesday, December 21, 2011

Rudolph, Santa, and Snowman Candy Bar Wrappers

Hi Everyone!

While I sat here last night gluing red pompom noses on “Rudolph” candy bars I laughed to myself because I know Marie will laugh when she sees my creations and will tell me that I “need a life”. As those thoughts entered my mind I realized that I am in a “very happy” place in terms of crafting. I feel totally at peace when I sit here day after day creating cards and other papercrafts. The satisfaction I feel as I create cards and gifts for family and friends is euphoric. It’s taken about 5 years to build up my stash of tools and other supplies, but I am at the point where I feel that I have everything I want and need. I have learned which adhesives I prefer and which companies offer the quality of stamps, papers, and other supplies that I want. Happy place. I am in a happy place.

Today is my friend Susan DeMuth’s birthday. Susan created my logo. Susan is the owner and artist of Shapes, ETC. I met her at least 12 years ago while I was working at a store that suddenly closed nearly 2 years ago. We became friends instantly and our friendship remains strong even though we live many miles apart and rarely see each other. She’s in New York and I am in Massachusetts. I mention Susan because I give her full credit for turning me onto this wonderful papercrafting addiction. I also give her credit for suggesting that as I purchase a supply to find it a home so that I can always put my hand on whatever I need. Most of my supplies are here with me in “my own little corner”, but even the things that aren’t in this immediate area are organized and have their own little “home” just as Susan suggested.

I spotted a variety of snowman candy bar wrappers while I was surfing the net a few days ago. I thought they all were adorable and looked (and are) easy to create. I searched and discovered other seasonal candy bar wrappers too. My designs are all variations of ideas I found on the Internet.

Here are the candy bars Robbie, Marie and Jeanne will find in their stockings on Christmas morning.
The antlers on this reindeer were created from the purple Marvy Uchida snowflake paper punch.  I pieced parts of the snowflake together .  The googly eyes, pompoms, ribbon and bells are from my stash.  It's so much easier to create when you have a stash of stuff.


The hat on this snowman's head was created with a finger from an inexpensive glove.  Use Scor-pal tape or another adhesive to adhere it to the candy bar. 


Here's an easy way to create the belt and buckle for this Santa candy bar.  Cut a strip of black paper that is 3/4" wide and about 5.5" long and adhere it across the center of the red paper.  Then cut a one inch square of gold paper and glue it to the center of the belt.  Cut a 3/4" square of black paper and glue it to the center of the gold paper.  Looks like a buckle doesn't it!


If you need a very quick candy bar just wrap a piece of patterned paper around it!

That's it for today!  Run out to the store.  It's not too late to make the candy bars!

Have a great night.
Carol


Tuesday, December 20, 2011

Joy

Hi Everyone!


The inspiration for today's card came while I was visiting the Crate & Barrel website.  I spotted a coffee mug that I knew would be perfect for Marie.
I realized I could easily create a coordinating card.  I searched through my sticker drawer and found several packages of "Design Your Own Sticker" from Momenta.  If you aren't familiar with these stickers it's time for you to learn about them.  Basically you purchase a package of the stickers.  The directions on the back of the package tell you to go to the Momenta website, type in the code for the package, choose the design or colors you want your stickers to be and print them.  The hardest part may be choosing from the hundreds of colors and designs. 

Here's the card I made for Marie.


Pretty cool, huh!  I think she'll love the card and the mug. 

Have a great day!
Carol

Sunday, December 18, 2011

Gingerbread House in a Frame

Hi Everyone!

About 6 weeks ago I read that May Arts Ribbon was having a "Deck the Halls with Burlap" Challenge.  The challenge was to use 4 of their burlap ribbons to create your choice of a holiday craft.  Every participant was sent 2 yards of the 4 ribbons. 

The moment I saw the photograph of the wide ribbon with the red and white striped edges I thought of using it on a gingerbread house.  When my ribbon arrived I pulled out my Christmas brads and buttons and started to plan my project.

I traced the edges of a gingerbread house pan onto a sheet of Memory Box paper and cut it out.   Then I used 1/2" wide Scorpal tape to help pleat the wide ribbon that I used for the shingles on the roof. 
I threaded the thin green burlap ribbon through some peppermint buttons that MaryBeth gave me a few years ago and used glue dots to adhere them to the "shingles".  You can see that I used a piece of the wide ribbon for the chimney, doors, and part of the windows. 

A 3rd kraft colored burlap ribbon became the shutters for my house.  I think that may be my favorite ribbon.  I stitched a tree with the 4th ribbon. 

The wreaths and candy canes are brads.  The taffy candies are Martha Stewart stickers.  The decorations on the tree are brads, Favorite Findings buttons, and stickers. 

I used my pink Marvy Uchida circle punch to create the moon and then I used an A Muse Artstamp to stamp Santa and his sleigh flying across the moon. 

The layering paper is from SEI's Kris Kringle collection. 

You can also see this project on the May Arts blog where you can see how other participants used their ribbon.  Please leave a comment here or on the May Arts blog.

Have a great day! 
Carol

Wednesday, December 14, 2011

Tea Cards

Hi Everyone!

I am feeling pretty excited right now.  I just mailed my last card order and it's only December 14.  This means I will have time to make some cards that I can send out from my family.  I learned something about myself yesterday.  I was working on a card order and even though I have created hundreds of cards I felt nervous as I worked.  I wasn't nervous when Carla asked me to bring cards I had already made to her Art Gallery and I'm not nervous when I create samples for my classes, but I was a wreck yesterday.  I am not usually a perfectionist, but when it comes to my paper crafts I want everything to look good.

I took pictures of some of my favorite creations and I have a few to share with you today. 

I sponge painted some white tag with acrylic paints and created my own patterned paper.  The tree was stamped with a Hero Arts "Tree Trunk" wooden stamp.  I used Distress Ink to paint the tree.  The birds and music notes are brads from Eyelet Outlet.


I found the small doilies that I use on my cards in the baking section at Michaels.  The tea cups were stamped with a clear stamp from the Hero Arts "What's Perking?" clear stamp set.  I fixed the tea bag string after I saw this photograph.


I love my wooden tea bag stamp from the Lockhart Stamp Company.  Love the SEI Homestead papers that I used on this card too. 

Going to decorate our Christmas tree now.  Will be back tomorrow!
Have a great day!  Have a great night too!
Carol


Saturday, December 10, 2011

Denami Design Gift Wrapping Blog Hop

Hi Everyone!


Today is the day of the Denami Design Gift Wrapping Blog Hop.  Here are the details for the hop.
When: The blog hop starts on December 11 at 6 AM, PST. However, you have until December 12, 2011, 11:59 pm PST, to leave comments on all the blogs (to be eligible for a prize).Why: To be inspired by fun DeNami Design creations and also the chance to win mini shopping sprees on the DeNami Design website!
Prizes: We are giving away THREE $20 gift certificates to our website! We'll be giving away one gift certificate to a random participant (DT members not eligible) and then we'll also be giving away TWO gift certificates to TWO people who comment along the hop.


If you started at the beginning of the hop you have arrived here from the creative and fun blog of
Lani Misner at http://mutantscrapbooker.blogspot.com/
If you get lost along the way you can always start at the beginning of the blog at http://denami.blogspot.com/
You are now at Carol Hartery's blog.  I had originally planned to create a more labor intensive project for this challenge, but then I thought about how busy we all are at this time of year and decided you (and I) would be happier with an idea that’s quick and easy to create and says, "Merry Christmas" to the recipient.


I own 3 of the 4 sizes of the Dot Circle Frames and find myself using them over and over again for my cards and other paper crafts. For today’s project I selected the Medium Dot Circle and Small Solid Circle wooden stamps. I printed Denami Design's downloadable template for the small gift bag on a sheet of white tag. Then I used my Scarlet and Fresh Green ColorBox pigment stamp pads with the stamps and stamped all over the bag.  I sprinkled Detail Clear Embossing Powder over the stamped images and embossed them with my heat gun.


This gift bag is the perfect size for a gift card or a small gift.  It can also be used as a favor bag at the dinner table.  For this blog hop I used Christmas colors on the bag, but you could use school colors if you were creating a bag for a graduation gift or other holiday colors on other holidays.  You can purchase the template for this gift bag on the Denami Design web site at this link http://denamidesign.com/cart.php?m=product_detail&p=999

Before you hop on over to Andrea Matthews amazing blog at http://workinprogress-am.blogspot.com/ please stop and leave a comment on this blog.  You may also want to become a follower of my blog so that you can see some of the Christmas cards and crafts I will be sharing with you up until Christmas Day.

Hope you have a great day!
Carol


More Mini Cards

Hi Everyone!
Happy Saturday!  Two weeks from today is Christmas Eve!  Today I sorted through the gifts and stocking stuffers I have purchased so I could see what I have and what I still need to get.  Happily, shopping wise I am in pretty good shape.  But we still haven't baked any cookies and that's not good. 

Today I have more gift cards to share with you. 

The first card was created with a Denami Design's double circle stamp and a Denami Design's holly stamp.  The berries are small rhinestones and the bow was created with a Martha Stewart bow paper punch.
The hot chocolate was created with a Martha Stewart paper punch.  I added glitter to the whipped cream to make it sparkle.
The polar bears were created with a Memory Box stamp.


The wreath was created with a Martha Stewart paper punch.  The bell on the wreath is a Favorite Findings button. 
The gingerbread men were stamped with a Hero Arts stamp. 
Santa falling down the chimney was created with a Rosie's Roadshow wooden stamp.


Most of the images on these cards are buttons.  I especially love the dancing reindeer.

That's it for today.  Have a great night!
Carol


Thursday, December 8, 2011

Christmas Mini Cards

Hi Everyone! 

I want to start off today's blog with a story.  Recently my computer was attacked remotely.  I fell for a Scareware scam and gave them my credit card information.  The logo on the Scareware closely resembled  Windows logo which is why I thought it was genuine.  Happily my bank is replacing the money in my account.  Although the viruses I was told were on my computer weren't really there somehow many of my files were corrupted, my computer couldn't communicate wth my printer, and I couldn't save any files as PDFs.  To make a long story short my sister Pam and her husband Norris bought me a new computer and a wonderful friend, Mary Anne, set up my new computer and transferred all of the files from my old computer.  Thank you again Pam, Norris and Mary Anne.

I have been incredibly busy fulfilling card orders.  I have this terrible feeling that once again this year "the cobbler's children may go barefoot" because I don't know how I will find the time to create cards for us to send. 

Mini cards which you may also know as "gift cards" have been very popular this year.  I play around with my stamps, paper punches, buttons, brads and patterned papers and create a variety of adorable cards. 
I created 18 mini cards today (12 different ones), but still need to photograph them.  However, I have photographs of the ones I created yesterday to share with you.


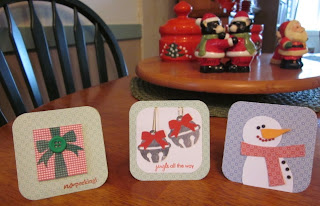
The card that looks like a Christmas present was created with a stamp from PaperTrey Ink's Holiday Button Bits clear stamp set.  The jingle bells with bows were created from Martha Stewart paper punches.  I free cut the snowman on the third card.


The card with the button ornaments was created with a stamp from PaperTrey Ink's Holiday Button Bits clear stamp set and buttons from my stash.  The tree and the snowman on the middle card are Favorite Findings Buttons.  The gingerbread man on the third card was stamped with a clear stamp from PaperTrey Ink's Holiday Button Bits clear stamp set.

I found the reindeer button at Michaels in their Holiday buttons set.  The tree was created with a triangle paper punch. 


The polar bear was stamped with a wooden Memory Box stamp.  The text is from Hero Arts and the pine tree is a Favorite Findings button.

I'll be busy creating cards all weekend as I promised to fulfill some orders on Monday.  I am in the Denami Design blog hop on Sunday and have a May Arts Ribbon Challenge to submit by Monday.  Hopefully I will have time to photograph the mini cards that are next to me so that I can share them with you.

Have a great night!  Take care when you are opening your e-mails.  The bank told me there are hundreds of new scams each week. 

Carol