Good Morning Everyone!
I see a bright blue sky through my dining room window. Lots of squirrels running around out there right now. They must be stocking up on food before the next storm arrives.
Yesterday I played around with mainly one stamp called "Chickie with Heart Balloon" from Denami Design. The "Happy Valentine's Day" text is an A Muse Artstamp and the red heart on the first card is from Rubber Soul. All 3 stamps are on the tiny side, but all of them still give a clean impression when I stamp them which I believe is a testament to their quality.
Covered the chickie's heart balloon with an epoxy heart sticker to make her umbrella. LOVE the cloud dies I used from PaperTrey Ink. I paper pierced them before I adhered the layering paper to the blank card.
You've seen me use the sketch for this card over and over again. The chickies are on 1.25" squares and are mounted on 1.5" squares. The dotted embossing definitely adds some fun texture to the card. Button is from my stash. I think it's a Favorite Findings, but I am not positive.
Robbie laughed when he saw this card and commented "That's a lot of blank space!" but that's what I like about the card. I used a Cuttlebug Hearts embossing folder to emboss the layering paper. Covered the chickie's heart with an epoxy sticker.
I was imagining a flock of chicks floating through the air when I created this card. Used my PaperTrey Ink cloud dies again and paper pierced them again. Created the text on my computer.
I have a little rainbow thing going on here as the chicks line up. Stamped a chick about every .75" Red heart jewels on red heart layering paper. They work. The jewels catch the light.
I thought about not posting this card. At least not yet because I know it needs something else, but I haven't figured out what that something is. After I studied the photograph of it I anchored the corners down better as I hate an untidy looking card. The layering paper is embossed. I'm afraid to stamp a text at this point because I'm not sure how cleanly I could stamp on the embossing.
Off for a day of errands with Marie. Have a good one!
Carol
Good Morning Everyone!
Do you remember the song "In My Own Little Corner" from Roger and Hammerstein's Cinderella? I often think of that song and of the scene that song was sung in when I sit here working "in my own little corner". I spend more time in the corner of my dining room than I do in any other room in our home. It's in this corner that I plan and prep my early childhood teacher trainings, my afterschool classes for children, and my adult education classes. I sit here when I am planning meals and creating shopping lists. It's in this corner that I dream of and create all of my paper crafts.
As I sit here typing this post my valentine wooden stamps are displayed on the wall directly above me. Rolls of red, pink, and white ribbons are strung on the paper towel rack below my stamp shelves. My heart paper punches are to the right of me along with my valentine and other embossing folders, my clear valentine stamps, and my heart Nestabilities.
I often fidget with the heart shaped buttons that are sitting here next to me in a small red heart shaped bowl. I have a plastic drawer that is filled with valentine papers and some smaller drawers that hold my valentine stickers, brads, and embellishments.
My collection of papercrafting books and magazines are housed on some nearby shelves.
With all of this inspiration within an arm's reach it's easy to come up with ideas for the cards, tags, bags, and boxes that I love to create. As I have said before I am most definitely addicted to paper crafting.
When I glanced up at my shelves last night my "Love Goes Round" stamp from Stampendous caught my eye. I found some musical notes paper in my Sassafras Nerdy Bird Wee bundle and decided it was just what I needed for the card I had sketched. Had some ribbon with tiny hearts on it and musical notes brads in my stash so I grabbed them. I used a few of my Marvy Uchida heart punches to punch some plain and scalloped hearts. After I assembled them I ran them through a Cuttlebug embossing folder. I used red tag for the "lace" on my hearts because I thought it would draw out the red on the musical notes. As I sit here looking at the card right now I am thinking I may have liked white "lace" better so I'll try it that way on a similar card.


Enjoy your day!
Carol
Good Morning Everyone!
I purchased a dcwv "All About Boys" small stack at JoAnn's the other day. It's filled with all sorts of cool papers with outer space, pirate, zoo, under the sea, cowboy, superhero, and robot themes. I just had to use some of the robot papers to create more valentines along with the Stampendous robot stamp I showed you a few blogs ago. This time I masked off the text from the stamp and used just it on some punched out hearts. I positioned the text on the hearts and the hearts on the cards in such a way to make them look like word balloons.
I'm nearly out of what seemed to be an endless supply of Lil' Robots chipboard pieces from My Mind's Eye. I added a few of the ones I had left to my valentines. The tiny "Happy Valentine's Day" message was created with an A Muse Artstamp.
Just couldn't pass up the opportunity to use my Hero Arts large cupcake cling stamp on some valentines. After all it does have some hearts on it. As I have done in the past on birthday cards I stamped the "muffin wrapper" part of the stamp onto one patterned paper and the "frosting" part of the stamp on a different patterned paper. I fussy cut both images out and ran the "muffin wrapper" through my crimper before I adhered it to the layering paper. I used dimensional tape to attach the "frosting" to the layering paper. The text is stamped on some Martha Stewart "ribbon style tags" that I spotted at TJ Maxx a few days ago.
Now I need to stop creating cards for a few hours and creatively do some cleaning!
Have a good day!
Carol
Hi Everyone!
While Robbie was out shoveling our driveway after yet another snowstorm I created a birthday card for a friend's grandson. Matthew is a Green Bay Packers Fan and wants a football theme birthday party.
I didn't have any football paper in my stash, but found some at JoAnn's. I cut the paper down so that it measured 5.25" wide by 4" high and attached it to a blank card. I searched on Google images for a photograph of a Green Bay Packers helmet, scaled the image down to 35% and printed 2 of them. After I fussy cut both helmets, I adhered one to the layering paper and then used dimensional tape to layer the second helmet on top of the first one. This gave the helmet a 3 dimensional appearance.
Placed "Rah! Rah! Rah!" stickers and an epoxy football sticker on the card and used alphabet stickers to spell out the birthday message to Matthew. Showed it to Rob who gave it a thumbs up so off it goes into the mail.
Happy Birthday Matthew!
Have a great day everyone!
Carol
Hi Everyone!
 This is one of the valentine stamps that I added to my collection this year. It's called "Robot Friends" and it's manufactured by Stampendous. I just used it to create some very quick and easy valentines.
After I stamped the image onto white tag I used my Marvy Twinklette markers to color it. You can't tell by the photograph, but because I used those markers to color the entire image it's very sparkly. I found some Lil' Robot chipboard embellishments from My Mind's Eye in my stash and added them to the card.
The robot, gears, and word balloon on this card are also chipboard embellishments from My Mind's Eye. This time I masked my stamp and only stamped the text. I cut the text out and glued it to the word balloon.
Visiting with my friend Susan today and then I must continue to prep my workshops.
Have a great day! Stay warm!
Carol
This is one of the valentine stamps that I added to my collection this year. It's called "Robot Friends" and it's manufactured by Stampendous. I just used it to create some very quick and easy valentines.
After I stamped the image onto white tag I used my Marvy Twinklette markers to color it. You can't tell by the photograph, but because I used those markers to color the entire image it's very sparkly. I found some Lil' Robot chipboard embellishments from My Mind's Eye in my stash and added them to the card.
The robot, gears, and word balloon on this card are also chipboard embellishments from My Mind's Eye. This time I masked my stamp and only stamped the text. I cut the text out and glued it to the word balloon.
Visiting with my friend Susan today and then I must continue to prep my workshops.
Have a great day! Stay warm!
Carol
Hi Everyone!
It's been a busy day here. I have a friend who requested a bridal shower card, a friend who requested 5 valentine cards, and another friend who wanted some thank you cards. So in between laundry, cleaning, and prepping next week's workshops I made some cards.
I used an umbrella from Lawn Fawn's "Partly Cloudy" clear stamp set for this bridal shower card and gift tag. After I stamped the umbrella and the text I ran the white tag through a Cuttlebug Hearts embossing folder. The text was created with a clear stamp from Hero Art's "Best Wishes" set. The tiny hearts on the card and tag are "scrap hearts" that come from a Martha Stewart's hearts edger punch. There are tiny white pearl embellishments on the umbrellas.
I made a variety of thank you cards. These cards were made with paper from Cosmo Cricket's Material Girl block. I stamped a spool of thread from PaperTrey Ink's "Quilter's Sampler" set on the first card and a pincushion from Hero Art's "Sew Artsy" clear set on the second one. The "Sew Much" text stamp is from Stampabilities.
Here's one of the valentines that I made. I used Hearts Nestabilities to cut out the 2 hearts, a Martha Stewart edger punch on the layering paper. The love birds and the text were stamped with A Muse Artstamps. The branch is from the Hero Arts "Trees, Birds & Messages" clear stamp set.
Have a great night!
Carol
Hi Everyone!
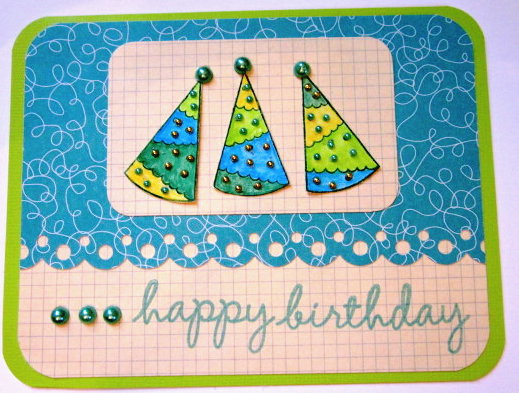
It all began when I was viewing the sale stamps on the A Muse Art stamps web site. I was looking at the image for the Holiday tree stamp, but I didn't see it as just a tree. I also saw it as a party hat. Best of all that holiday tree/party hat was and still is on sale for just $2.00. So I purchased that stamp and a few others and 2 days later the package arrived at my house.
I used my water color pencils to color in 3 "party hats", cut them out, and adhered them to some paper from the Sassafras Nerdy Bird wee bundle. I adhered that paper to another paper from the Sassafras Nerdy Bird wee bundle, and stamped "happy birthday" with a clear stamp from my collection. I attached jewels from my stash to the dots on and the tops of the party hats.
Now that I had created one birthday card I decided to make a few others. I used some papers from
Cosmo Cricket's Material Girl pad and a Hero Arts cupcake cling stamp to create this card. I stamped the bottom part of the cupcake stamp onto one paper and the top onto another paper. After I cut it out, I ran the "muffin wrapper" part of the cupcake through one of my paper crimpers and attached it to the layering paper. After cutting out the "frosting" on the cupcake I used pop dots to attach it to the layering paper.
The musical notes paper on this card is also from the Sassafras Nerdy Bird wee bundle. The cupcakes paper is from SEI's Happy Day collection. The birds are cut from a paper from dcwv Songbirds pad.
That's it for today!
Have a great night.
Carol